Arranging object on the view
Objects could be selected to be manipulated as a group. Main arranging object actions require selecting a group first.
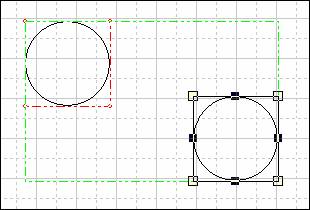
The selection could be performed in two ways:
Selective picking: Click the first object of the group and then maintain the Shift key pressed and click the other ones.
Visual picking: Define a rectangle around the object with the mouse by holding the left mousse button and moving the mouse from the upper left corner of this rectangle to its lower right corner. Moving from the lower right corner to the upper left corner works too.
A group of object is identified by a dotted green line.
Selection of all the objects in the view is possible from the menu option Edit and Select All.
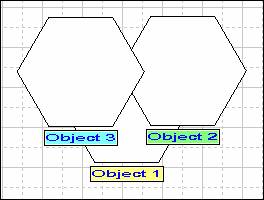
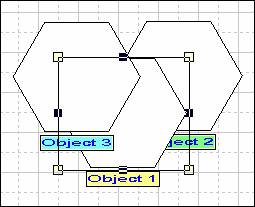
Ordering objectObject on the drawing are ordered by default when added to a drawing.
Even if it is not always visible they are stacked on each other.
On this example 3 object are added to the drawing. It is obvious that the last object inserted object 3 cover object 2 that cover the object 1.
This order could be change either with the menu or button.
Buttons that modify object orders are:
|
|
Goto Last position |
The selected object is move behind the all other object (layer) |
|
|
Goto First position |
The selected object is displayed in front of the next object (layer) |
|
|
Up position |
The selected object is move in front of the next object (layer) |
|
|
Down position |
The selected object is move behind the next object (layer) |
|
|
Select New object |
Select the next upper object in the display order (layer). |
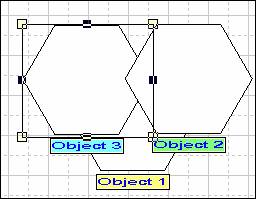
Goto Last position
If we apply this action on the object 3 we get the following result
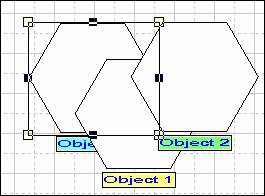
The object 3 is behind all other objects.
Goto First position
If we apply this action on the object 1 we get the following result
The object 1 is in front of all other objects.
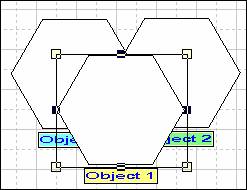
Up position
If we apply this action on the object 1 we get the following result
The object 1 has moved one layer up.
Down position
If we apply this action on the object 3 we get the following result
The object 3 has moved one layer down.
Sizing the objectTo modify the size of an object drag on one of its corner. By default the aspect ratio is conserved.
If you do not want to preserve the aspect ratio (width/height proportion) open the properties dialog box of the object and unselect the Lock Size Ratio checkbox.
To modify only the width or the height of an object drag on one of its small black rectangular handle.
An exact size could be set in the properties options of the object. Simply enter the value in pixel for the desired height and width in the object configuration property window.
The object size could be adjusted to the size of another object. To realize the sizing select the first object to resize and hold the SCHIFT button then click on the second object that will be the reference.
You get two objects with a dotted red selection rectangle around.
Select the action you wanted to perform from the menu or the lower toolbar.
|
|
Make same width |
Size n objects with the same width as the last selected one |
|
|
Make same height |
Size n objects with the same height as the last selected one |
|
|
Make same size |
Size n objects with the same height and width as the last selected one |
|
|
Resize from height |
Resize an object with the same height as its width |
|
|
Resize from width |
Resize an object with the same width as its height |
You could modify the size of any number of objects; just select them by holding the shift key and doing a single click. Remember that the last object selected becomes the reference for the resizing dimension.
The Make same width applied to two rectangles gives the following result:
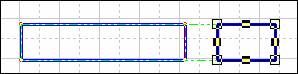 ĀBefore a Make same width
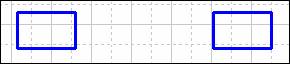 ĀAfter a Make Same Width
The first selected rectangle has now the same width as the last selected rectangle.
To move an object in a view click on the object and maintain the left mousse button pressed. Move the object to its new position.
A cross cursor is displayed to notify you that you are in the moving mode.
You can also specify in the object properties the X and Y values of its position. These coordinates are relative to the upper left corner of the drawing area.
To move a group of objects select them by holding the SHIFT or CTRL key and then move them like a single object.
You move the mouse over one object in the selection and wait for the cross cursor before moving.
You can align objects to each other. When you align objects to objects, you can line them up on one of their border.
Select the objects to align and perform an action from the menu option shape or by a single click on the required button. The reference used for alignment is the last selected object.
Align options:
|
|
Align top |
Align n objects on the top side of the last selected one |
|
|
Align bottom |
Align n objects on the bottom side of the last selected one |
|
|
Align left |
Align n objects on the left side of the last selected one |
|
|
Align right |
Align n objects on the right side of the last selected one |
|
|
Centre horizontal |
Centre n objects on the horizontal position of the last selected one |
|
|
Centre vertical |
Centre n objects on the horizontal position of the last selected one |
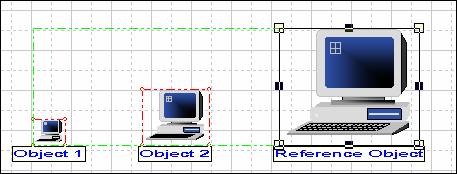
As example, we start from the following object disposition
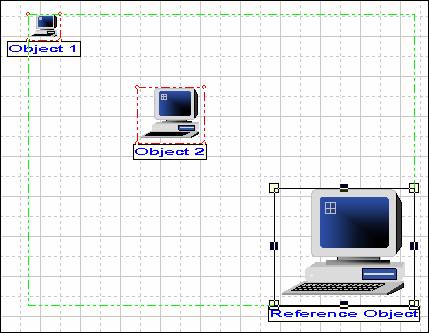
Align left. Click on the align left button ![]()
The result is:
The objects are aligned on the left border of the reference object. The reference object has not move on the view.
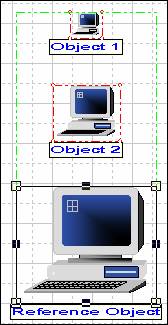
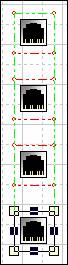
Align right. Click on the align left button ![]()
The result is:
The objects are aligned on the right border of the reference object. The reference object has not move on the view.
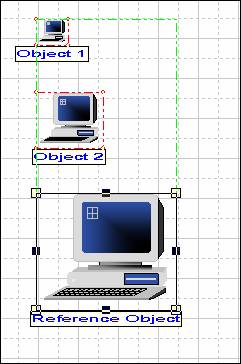
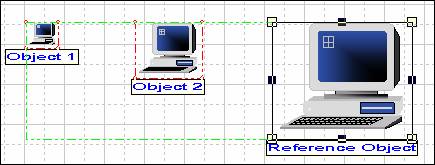
Align bottom. Click on the align bottom button ![]()
The result is:
The objects are aligned on the bottom border of the reference object. The reference object has not move on the view.
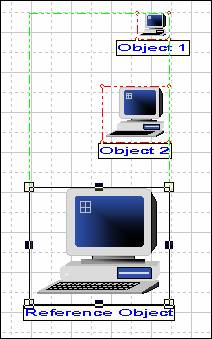
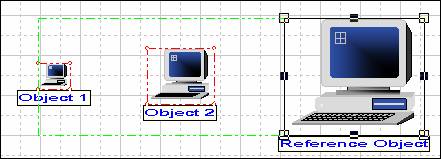
Align top. Click on the align top button ![]()
The result is:
The objects are aligned on the top border of the reference object. The reference object has not move on the view.
Centre horizontal. Click on the Centre horizontal button
![]()
The objects are aligned on a virtual horizontal line that traverses the center of each object. The reference object has not move on the view.
Centre vertical. Click on the Centre vertical button
![]()
 Ā
Ā
The objects are aligned on a virtual vertical line that traverses the center of each object. The reference object has not move on the view.
Distributing objectsYou can distribute objects at equal intervals in a selected group.
To option are available:
Space across option distributes objects horizontally with equal intervals.
Space down option distributes objects vertically with equal intervals.
To distribute horizontally:
Select the object to distribute, and perform an action from
the menu option shape or by a single click on the space across ![]() Ābutton.
Ābutton.

Click on Space Across, the object are spaced evenly horizontally.

To distribute vertically:
Select the object to distribute, and perform the action from
the menu option shape or by a single click on the space down ![]() Ābutton.
Ābutton.
Before alignment : 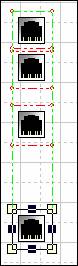 ĀAfter alignement :
|